「WordPressで吹き出しを使いたい」
「プラグインを使わずにhtmlとcssで吹き出しを作りたい」
と、WordPressで吹き出しを作りたいが、プラグインは使用せずにhtmlとcssで作成するにはどうしたいいかと悩んでいる方がいるのではないでしょうか。
そこで、今回はWordPressでプラグインを使用せずにhtmlとcssで「アイコン付きの会話風の吹き出し」を簡単に作成する方法をご紹介します。
htmlとcssを使用して、多様な吹き出しを作成できるようになるために、以下の3つの方法をご紹介します。
- アイコンの形を変更する方法
- 吹き出しの形を変更する方法
- アニメーションをつける方法
htmlとcssは全てコピーペーストして使用して大丈夫です。自分で好きなようにカスタマイズして、htmlとcssを使ってオリジナルの吹き出しを作成してください。
ちなみにプラグインを使った吹き出しの作り方を解説している記事もありますので一応リンク貼っておきます。
htmlとcssのみで会話風の吹き出しを作ろう
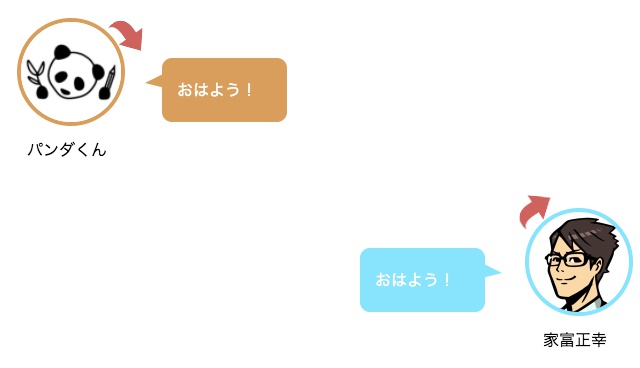
WordPressのプラグインを使用しなくても、以下のような会話風の吹き出しをhtmlとcssで簡単に作成できます。
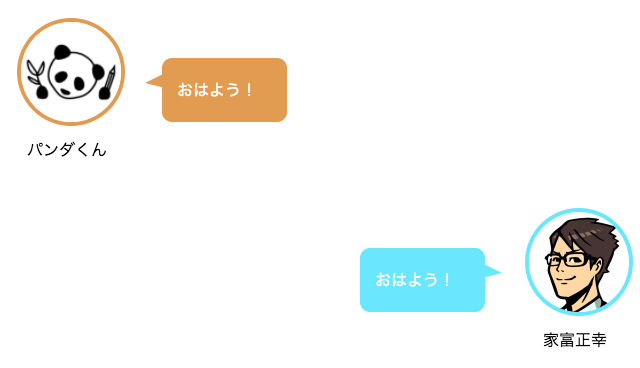
htmlは以下のようになります。
<!--左の吹き出し-->
 <div class="balloon-simple">
   <div class="icon-left">
     <img src="images/パンダくん.jpg" alt=""> //アイコン画像を変更できます
     <p>パンダくん</p> //アイコンの名前を変更できます
   </div>
   <div class="balloon">
     <div class="serif-left">
       <p>おはよう!</p> //吹き出しのセリフを変更できます
     </div>
   </div>
 </div>
 <!--左の吹き出し end-->

 <!--右の吹き出し-->
 <div class="balloon-simple">
   <div class="icon-right">
     <img src="images/家富正幸.png" alt=""> //アイコン画像を変更できます
     <p>家富正幸</p> //アイコンの名前を変更できます
   </div>
   <div class="balloon">
     <div class="serif-right">
       <p>おはよう!</p> //吹き出しのセリフを変更できます
     </div>
   </div>
 </div>
 <!--右の吹き出し end-->
cssは以下のようになります。
/* 共通 */

.balloon-simple {
 width: 100%;
 margin: 20px 0;
 overflow: hidden;
}

.balloon-simple .icon-right img,
.balloon-simple .icon-left img{
 width: 100%;
 border-radius: 50%; //アイコンの形を変更できます
 background-size:cover;
}

.icon-right p,
.icon-left p{
 text-align: center;
 top: -10px;
 position: relative;
}

.balloon-simple .balloon {
 width: 100%;
}

.serif-right,
.serif-left {
 position: relative;
 padding: 20px 30px 20px 15px;
 border-radius: 10px; //吹き出しの形を変更できます
}

.serif-right:after,
.serif-left:after {
 content: "";
 position: absolute;
 top: 15px;
 border-top: 10px solid transparent;
 border-bottom: 5px solid transparent;
 border-left: 5px solid transparent;
}

.serif-right p,
.serif-left p  {
 margin: 0;
 padding: 0;
 color: #fff; //吹き出しのセリフの文字色を変更できます
}

/* 共通 end */

/* 右の吹き出し */

.balloon-simple .icon-right {
 float: right;
 width: 100px;
 margin-right: 10px;
}

.balloon-simple .icon-right img{
 border: solid 4px #85e3ff; //右の吹き出しのアイコンの枠の種類・色・太さを変更できます
}

.serif-right {
 margin: 40px 40px 0 0px;
 background: #85e3ff; //右の吹き出しの背景色を変更できます
 float: right;
}

.serif-right:after {
 transform: scale(-1, 1);
 right: -22px;
 border-right: 20px solid #85e3ff; //右の吹き出しの三角部分の色を変更できます
}

/* 右の吹き出し end */

/* 左の吹き出し */

.balloon-simple .icon-left {
 float: left;
 width: 100px;
 margin-left: 10px;
}

.balloon-simple .icon-left img{
 border: solid 4px #da9e5b; //左の吹き出しのアイコンの枠の種類・色・太さを変更できます
}

.serif-left{
 display: inline-block;
 margin: 40px 0 0 45px;
 background: #da9e5b; //左の吹き出しの背景色を変更できます
}

.serif-left:after{
 left: -22px;
 border-right: 20px solid #da9e5b; //左の吹き出しの三角部分の色を変更できます
}

/* 左の吹き出し end */
以降の項目では、上記でご紹介したhtmlとcssを使用して、様々な吹き出しの作成方法をご紹介してきます。
1.アイコンの形を変更する方法
以下の3つのアイコンの形を変更する方法をご紹介します。
- 丸い枠のないアイコン
- 四角い枠のあるアイコン
- 四角い枠のないアイコン
丸い枠のないアイコン
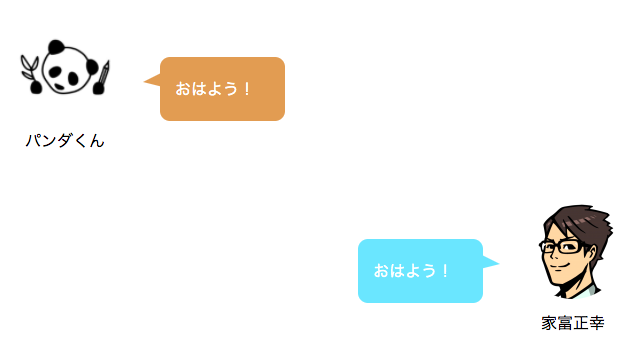
丸い枠のないアイコンに変更したい場合は、以下の画像にあるSTEP1とSTEP2のcssを全て削除してください。
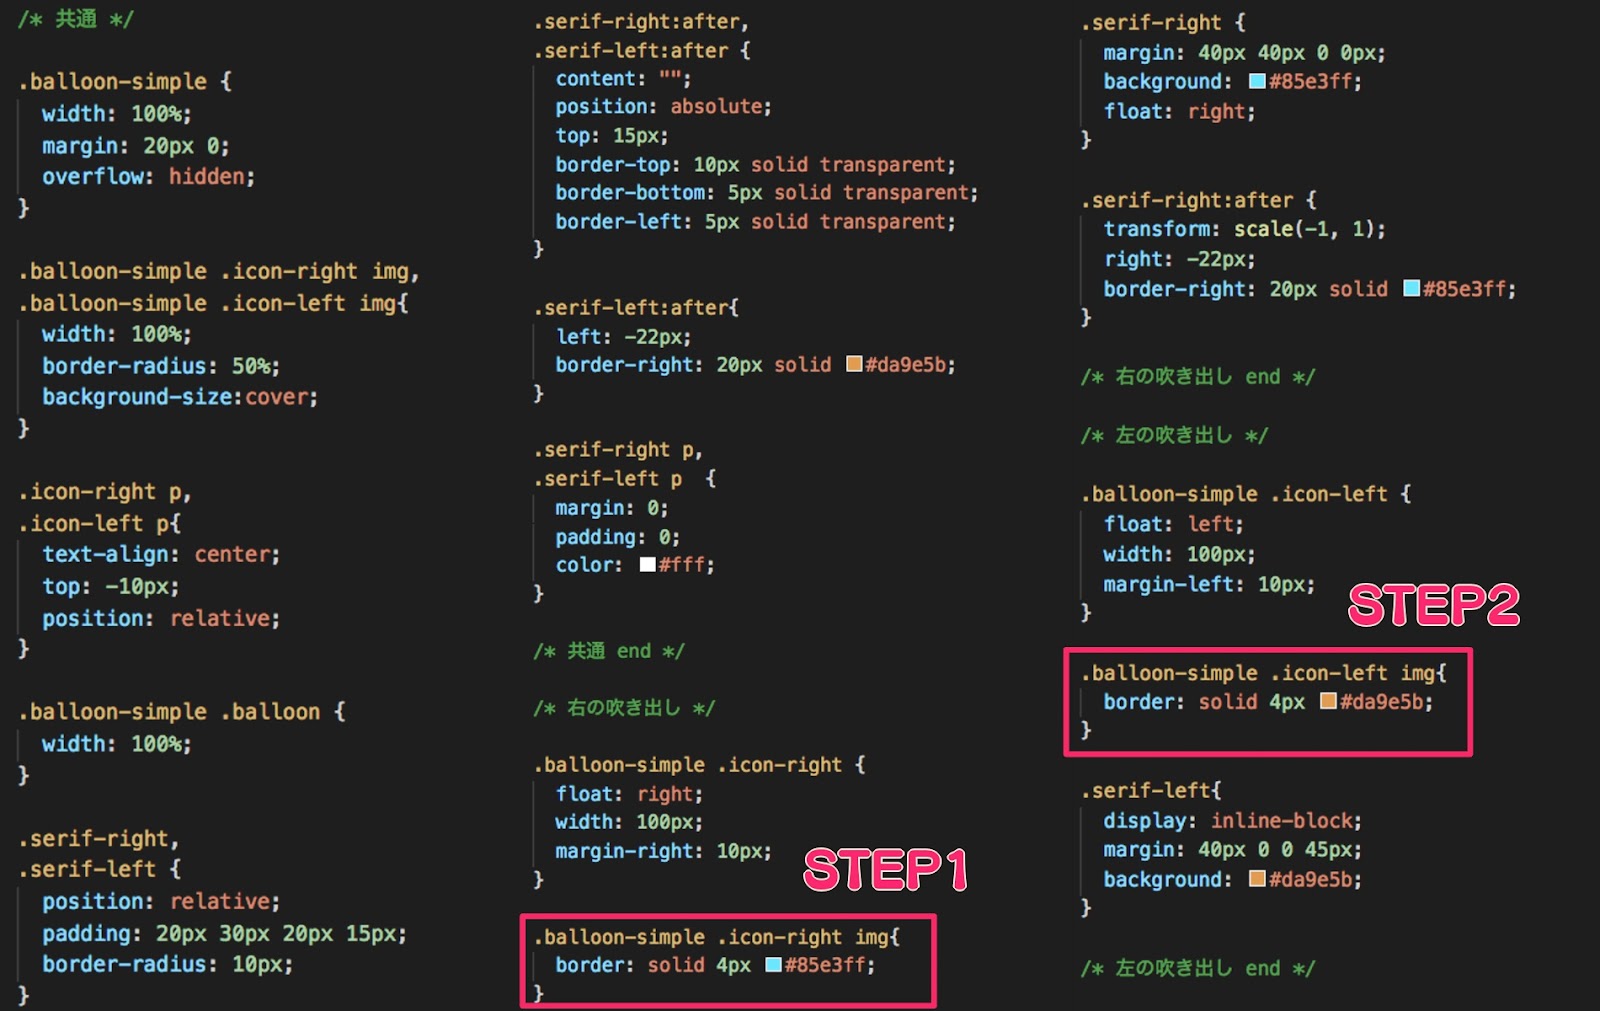
borderプロパティは、上下左右のボーダーラインを指定するcssです。また、ボーダーラインの太さ・色・線の種類を設定できます。
今回は、枠の無いアイコンにしたいため削除しました。
四角い枠のあるアイコン
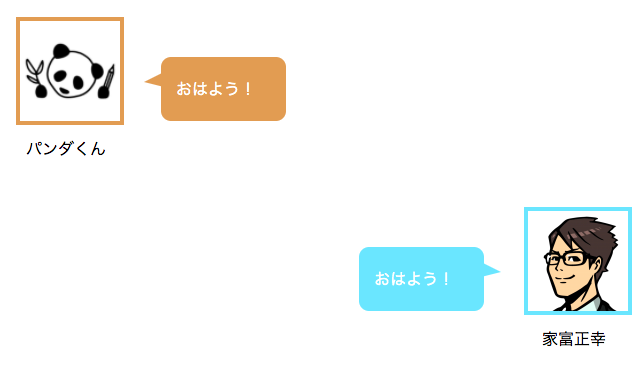
アイコンの枠を四角い形に変更したい場合は、以下の画像にあるSTEP1のcssを変更します。
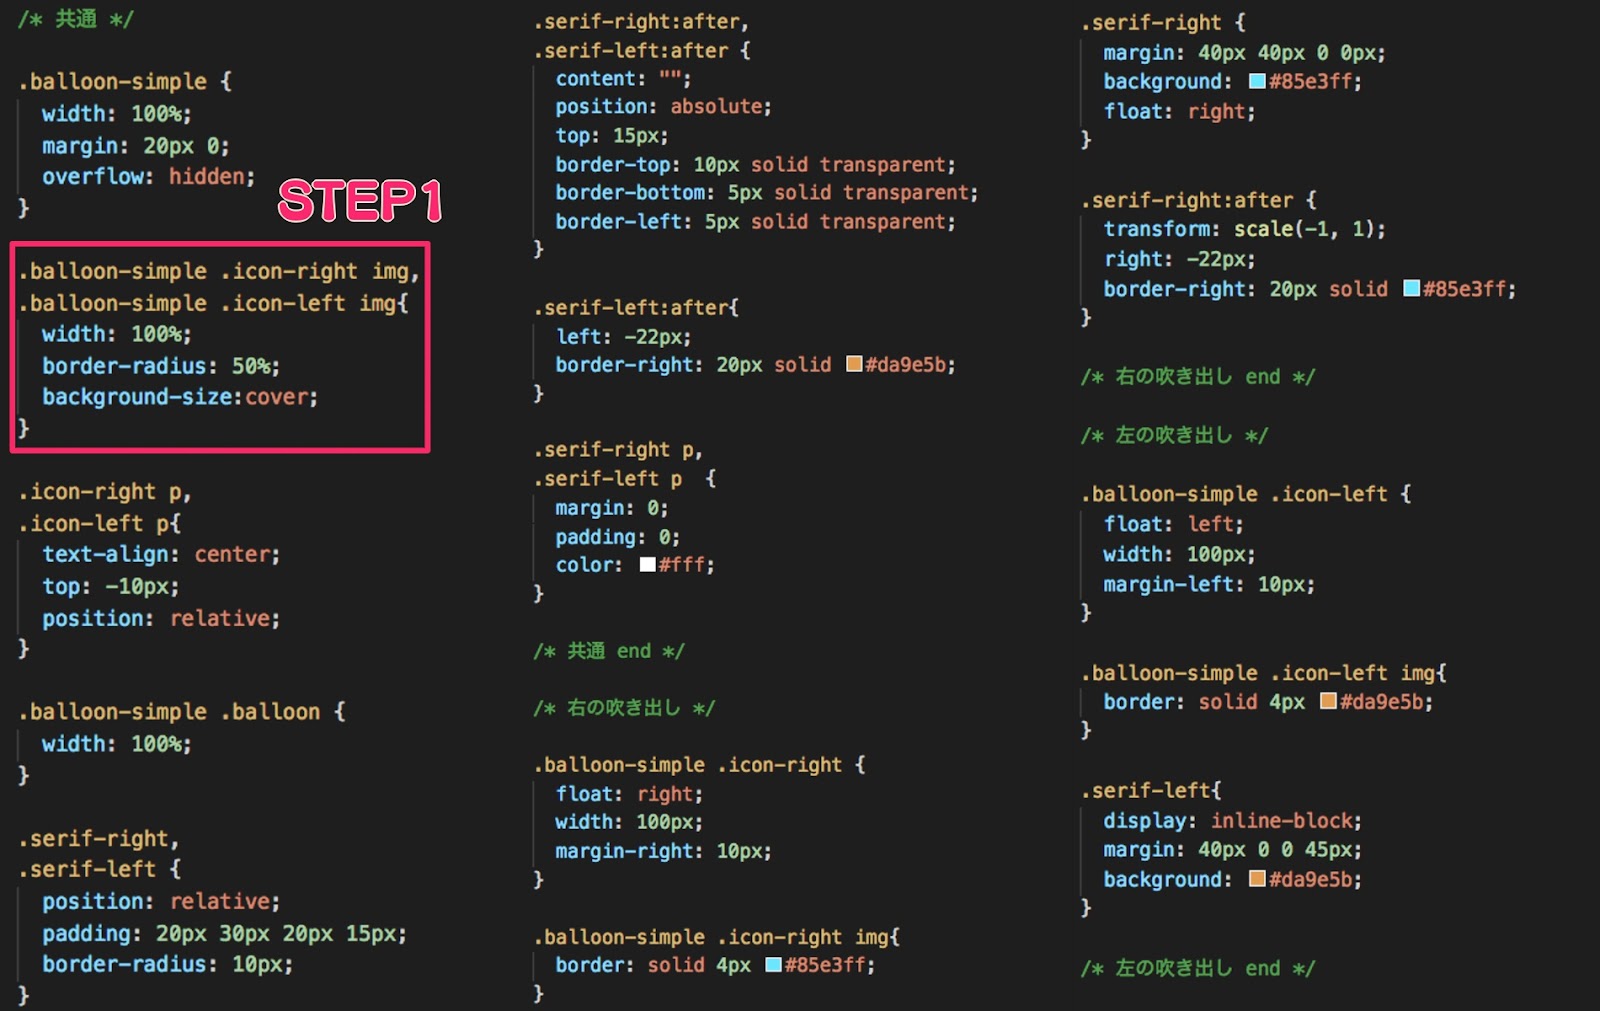
【css変更前】
.balloon-simple .icon-right img,
.balloon-simple .icon-left img{
 width: 100%;
 border-radius: 50%;
 background-size:cover;
}【css変更後】
.balloon-simple .icon-right img,
.balloon-simple .icon-left img{
 width: 100%;
 background-size:cover;
}
border-radiusプロパティは、ボックスの4つの角の形を指定する際に使用します。今回は、アイコンの形を四角にしたいため、必要がないので削除します。
アイコンの角を少し丸くしたい場合など、角の形を変更したい場合は、border-radiusプロパティの値を変更してください。
四角い枠のないアイコン
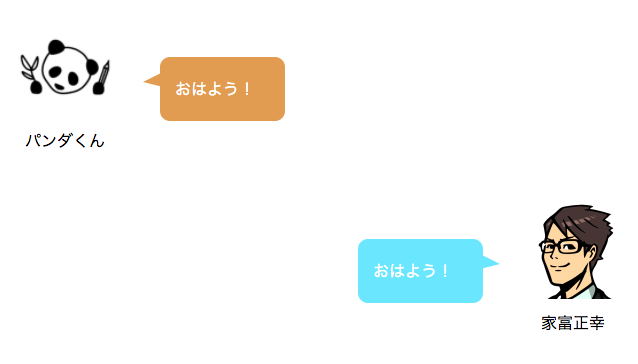
アイコンを枠のない四角い形に変更したい場合は、以下の画像にあるSTEP1のcssを変更し、STEP2とSTEP3のcssを削除します。

【css変更前】
.balloon-simple .icon-right img,
.balloon-simple .icon-left img{
 width: 100%;
 border-radius: 50%;
 background-size:cover;
}【css変更後】
.balloon-simple .icon-right img,
.balloon-simple .icon-left img{
 width: 100%;
 background-size:cover;
}
STEP1にあるborder-radiusプロパティは、先ほど説明したようにボックスの4つの角の形を指定する際に使用するため、今回は必要がないので削除します。
また、STEP2とSTEP3にあるborderプロパティはボーダーの種類・太さ・色を指定する際に使用します。今回は、枠のないアイコンにしたいためこちらも削除します。
2.吹き出しの形を変更する方法
以下の5つの吹き出しの形を変更する方法をご紹介します。
- 四角い吹き出し
- 丸い吹き出し
- 枠線がある吹き出し
- 影のある吹き出し
- 考え事風の吹き出し
四角い吹き出し
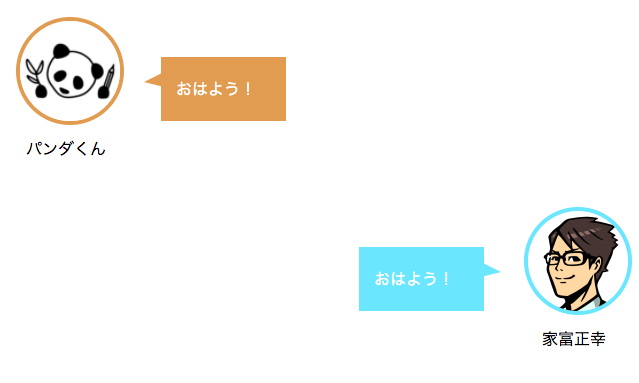
四角い吹き出しを作りたい場合は、以下の画像にあるSTEP1のcssを変更します。
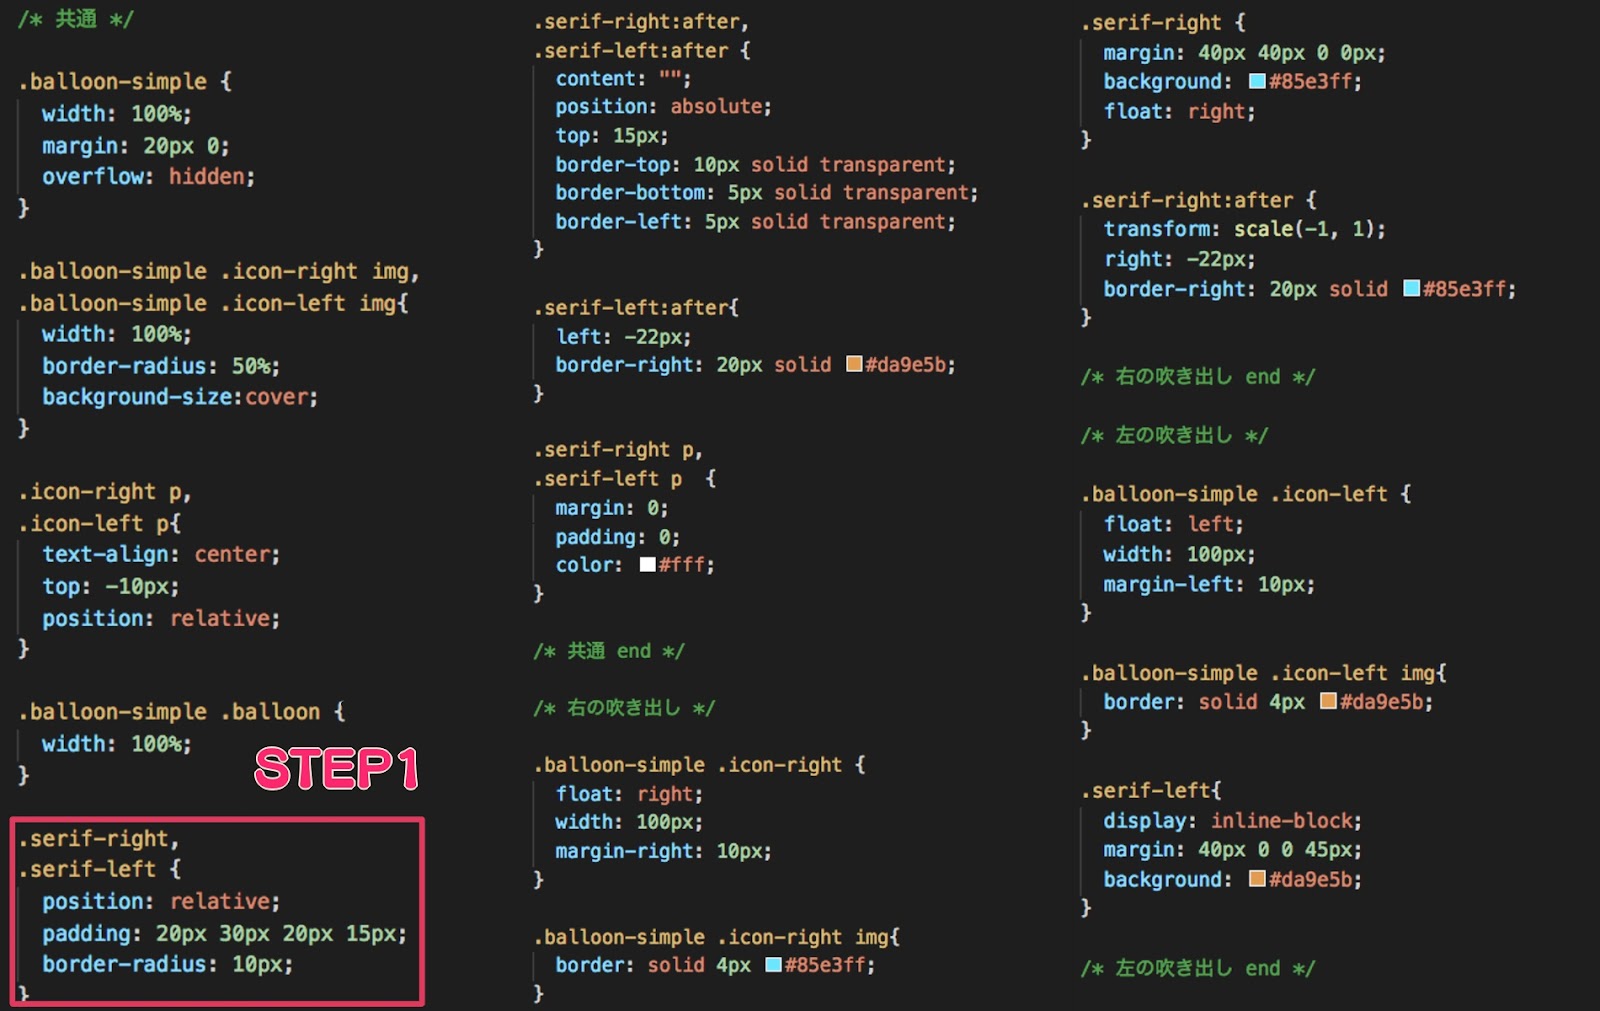
【css変更前】
.serif-right,
.serif-left {
 position: relative;
 padding: 20px 30px 20px 15px;
 border-radius: 10px;
}【css変更後】
.serif-right,
.serif-left {
 position: relative;
 padding: 20px 30px 20px 15px;
 }
border-radiusプロパティは、アイコンの形を変更する際にも説明したように、ボックスの4つの角の形を指定するものなので、今回は削除します。
丸い吹き出し

丸い吹き出しを作りたい場合は、以下の画像にあるSTEP1〜STEP6のcssを変更します。
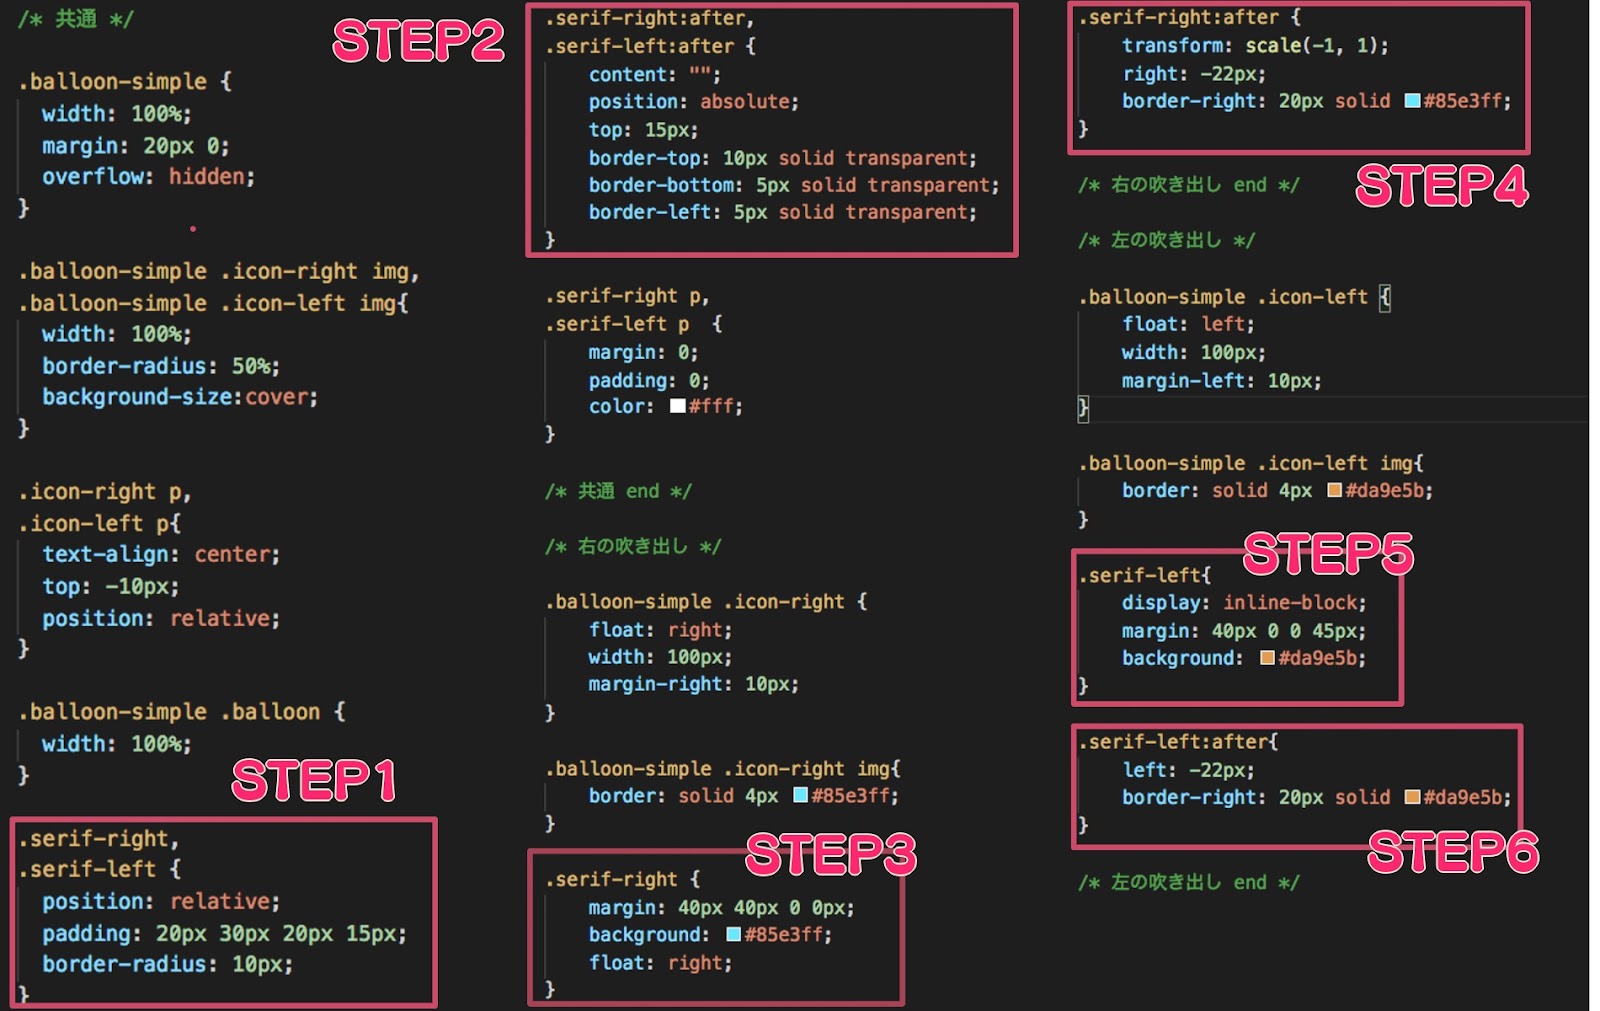
【css変更前】
STEP1
.serif-right,
.serif-left {
   position: relative;
   padding: 20px 30px 20px 15px;
   border-radius: 10px;
}
STEP2
.serif-right:after,
.serif-left:after {
   content: "";
   position: absolute;
   top: 15px;
   border-top: 10px solid transparent;
   border-bottom: 5px solid transparent;
   border-left: 5px solid transparent;
}
STEP3
.serif-right {
   margin: 40px 40px 0 0px;
   background: #85e3ff;
   float: right;
}
STEP4
.serif-right:after {
   transform: scale(-1, 1);
   right: -22px;
   border-right: 20px solid #85e3ff;
}
STEP5
.serif-left{
   display: inline-block;
   margin: 40px 0 0 45px;
   background: #da9e5b;
}
STEP6
.serif-left:after{
   left: -22px;
   border-right: 20px solid #da9e5b;
}【css変更後】
STEP1
.serif-right,
.serif-left {
 position: relative;
 padding: 30px 30px 30px 30px;
 border-radius: 100px;
 }
border-radiusプロパティは、ボックスの4つの角の形を指定する際に使用します。今回は、吹き出しの形を丸くしたいため、値を大きくしました。
STEP2
.serif-right:after,
.serif-left:after {
 content: "";
 position: absolute;
 top: 50px;
 border-top: 10px solid transparent;
 border-bottom: 5px solid transparent;
 border-left: 5px solid transparent;
}
吹き出し部分のレイアウトが崩れないように、topプロパティの値を変更しました。
STEP3
.serif-right {
 margin: 0 40px 0 0px;
 background: #85e3ff;
 float: right;
}
右の吹き出しの三角部分のレイアウトが崩れないように、marginプロパティの値を変更しました。
STEP4
.serif-right:after {
 transform: scale(-1, 1);
 right: -22px;
 border-right: 30px solid #85e3ff;
 position: absolute;
 height: 0;
 width: 0;
}
右の吹き出しの三角部分のレイアウトが崩れないように、border-rightプロパティの値を変更し、heightプロパティとwidthプロパティを追加しました。
STEP5
.serif-left{
 display: inline-block;
 margin: 0 0 0 45px;
 background: #da9e5b;
}
左の吹き出しの三角部分のレイアウトが崩れないように、marginプロパティの値を変更しました。
STEP6
.serif-left:after{
 left: -22px;
 border-right: 30px solid #da9e5b;
 position: absolute;
 height: 0;
 width: 0;
}
左の吹き出しの三角部分のレイアウトが崩れないように、border-rightプロパティの値を変更し、heightプロパティとwidthプロパティを追加しました。
枠線がある吹き出し
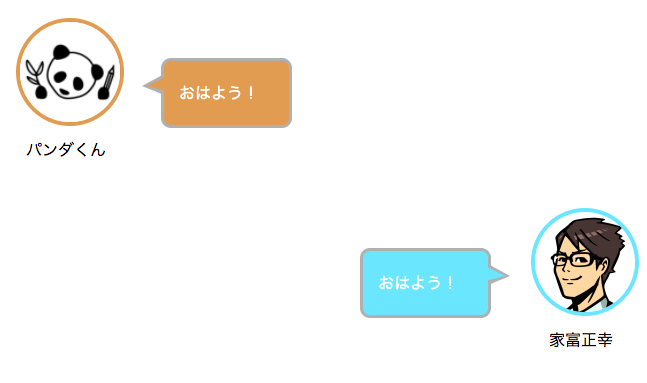
枠線のある吹き出しを作りたい場合は、下の画像にあるSTEP1のcssを変更し、右の吹き出しと左の吹き出し欄の末尾にそれぞれ新しくcssを追加します。
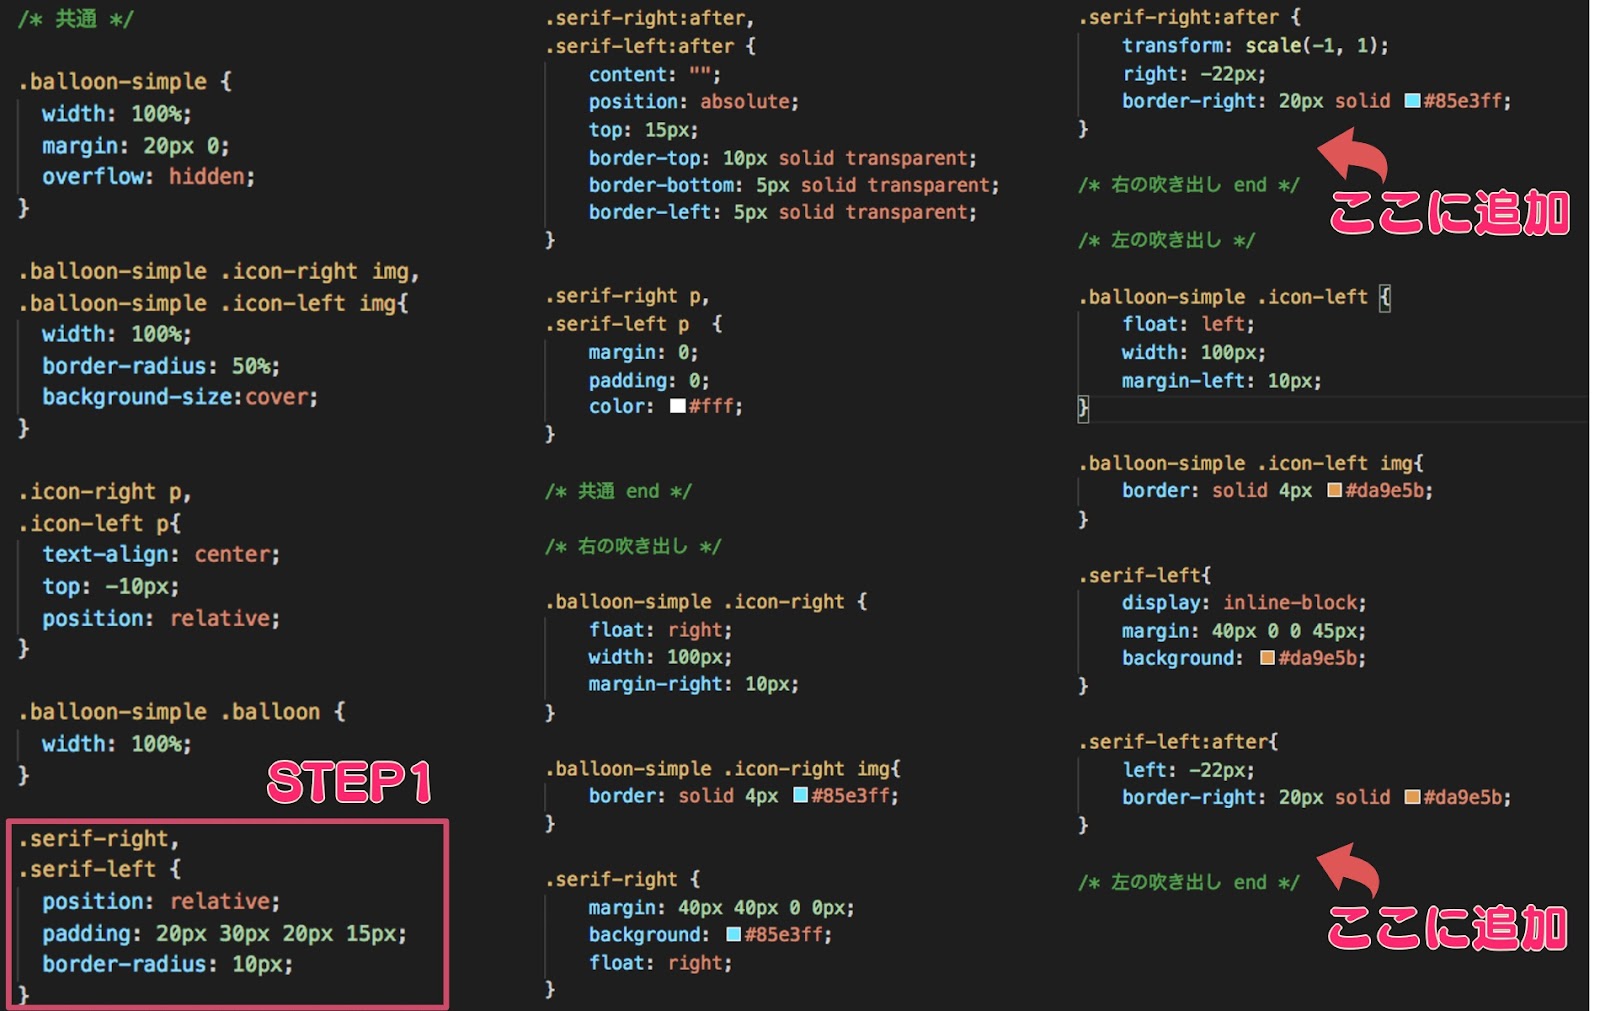
【css変更前】
STEP1
.serif-right,
.serif-left {
   position: relative;
   padding: 20px 30px 20px 15px;
   border-radius: 10px;
}【css変更後】
STEP1
.serif-right,
.serif-left {
 position: relative;
 padding: 20px 30px 20px 15px;
 border-radius: 10px;
 border: 3px solid #b0b0b0;
}
borderプロパティを追加して、吹き出しの枠に線を入れます。
右の吹き出し欄に追加
.serif-right:before{
 transform: scale(-1, 1);
 right: -22px;
 content: "";
 position: absolute;
 top: 13px;
 border-top: 12px solid transparent;
 border-bottom: 9px solid transparent;
 border-right: 22px solid #b0b0b0;
 border-left: 0px solid transparent;
}
吹き出しの三角部分にも枠線を追加するために、すでにある三角の下に新しい三角を追加して、重ねて表示するようにしています。
下の三角の色を変更して、ずらして表示することで、三角に枠線がついたように表示させています。
左の吹き出し欄に追加
.serif-left:before{
 left: -22px;
 content: "";
 position: absolute;
 top: 13px;
 border-top: 12px solid transparent;
 border-bottom: 9px solid transparent;
 border-right: 22px solid #b0b0b0;
 border-left: 0px solid transparent;
}
右の吹き出し欄に追加した内容と同様のcssです。
影のある吹き出し
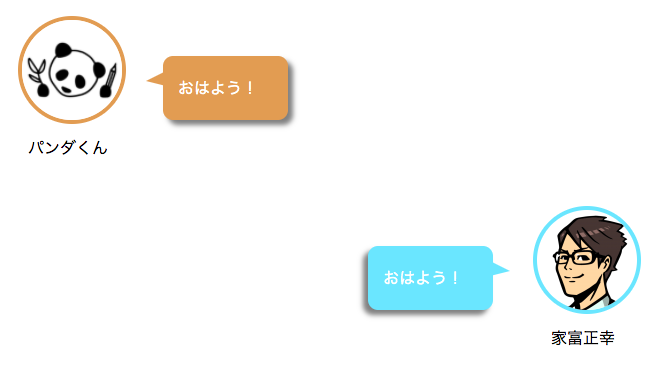
吹き出しに影をつけたい場合は、以下の画像にあるSTEP1とSTEP2のcssを変更します。
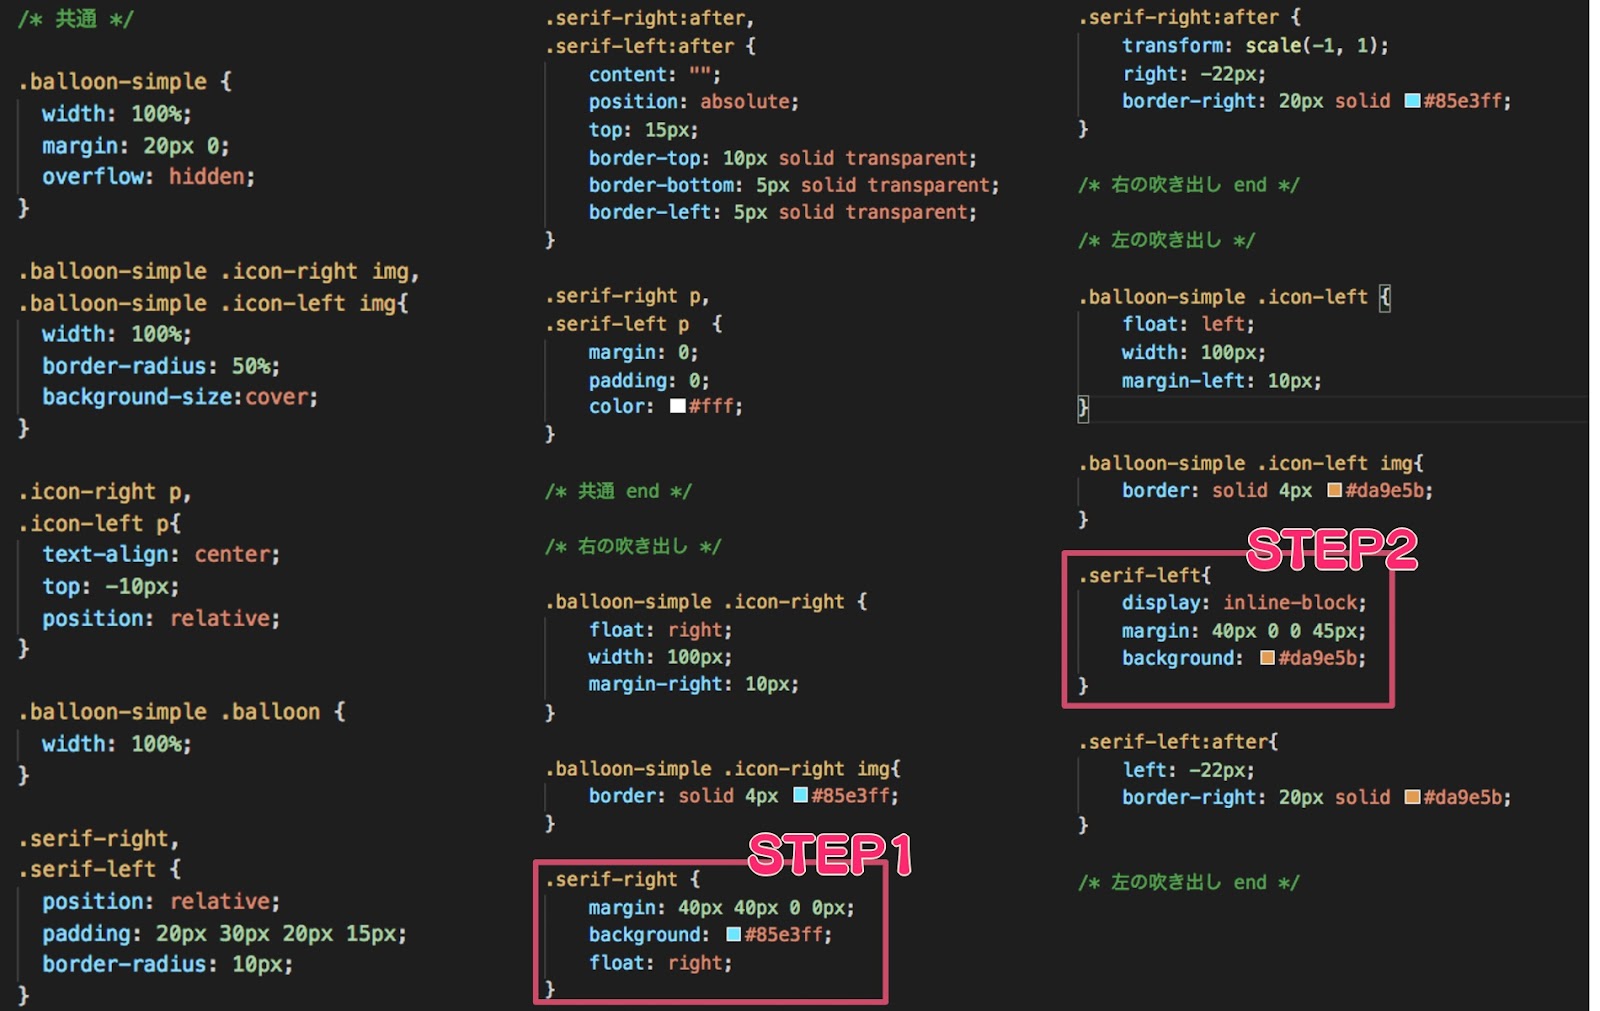
【css変更前】
STEP1
.serif-right {
 margin: 40px 40px 0 0px;
 background: #85e3ff;
 float: right;
}
STEP2
.serif-left{
 display: inline-block;
 margin: 40px 0 0 45px;
 background: #da9e5b;
}【css変更後】
STEP1
.serif-right {
 margin: 40px 40px 0 0px;
 background: #85e3ff;
 float: right;
 box-shadow: -5px 5px 5px 0px rgba(0,0,0,0.5);
}
STEP2
.serif-left{
 display: inline-block;
 margin: 40px 0 0 45px;
 background: #da9e5b;
 box-shadow: 5px 5px 5px 0px rgba(0,0,0,0.5);
}
STEP1とSTEP2ともに、box-shadowプロパティを追加しましました。box-shadowプロパティは、ボックスに影をつけたい際に用いるcssです。
値には、左から順番に水平方向の影、垂直方向の影、ぼかし距離、広がり距離、色、insetキーワード(内側の影に変更)を指定できます。
考え事風の吹き出し
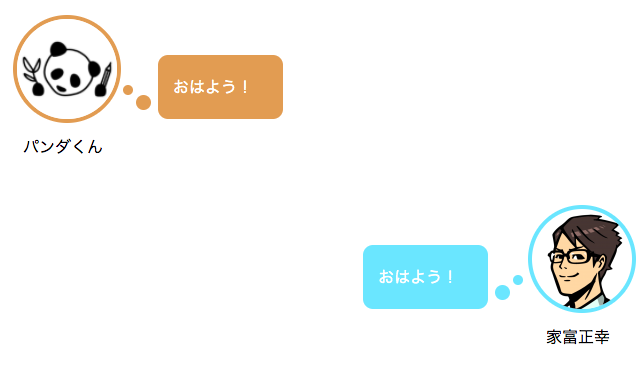
考え事風の吹き出しを作りたい場合は、以下の画像にあるSTEP1とSTEP2を変更し、ここに追加1〜ここに追加3に新しくcssを追加します。
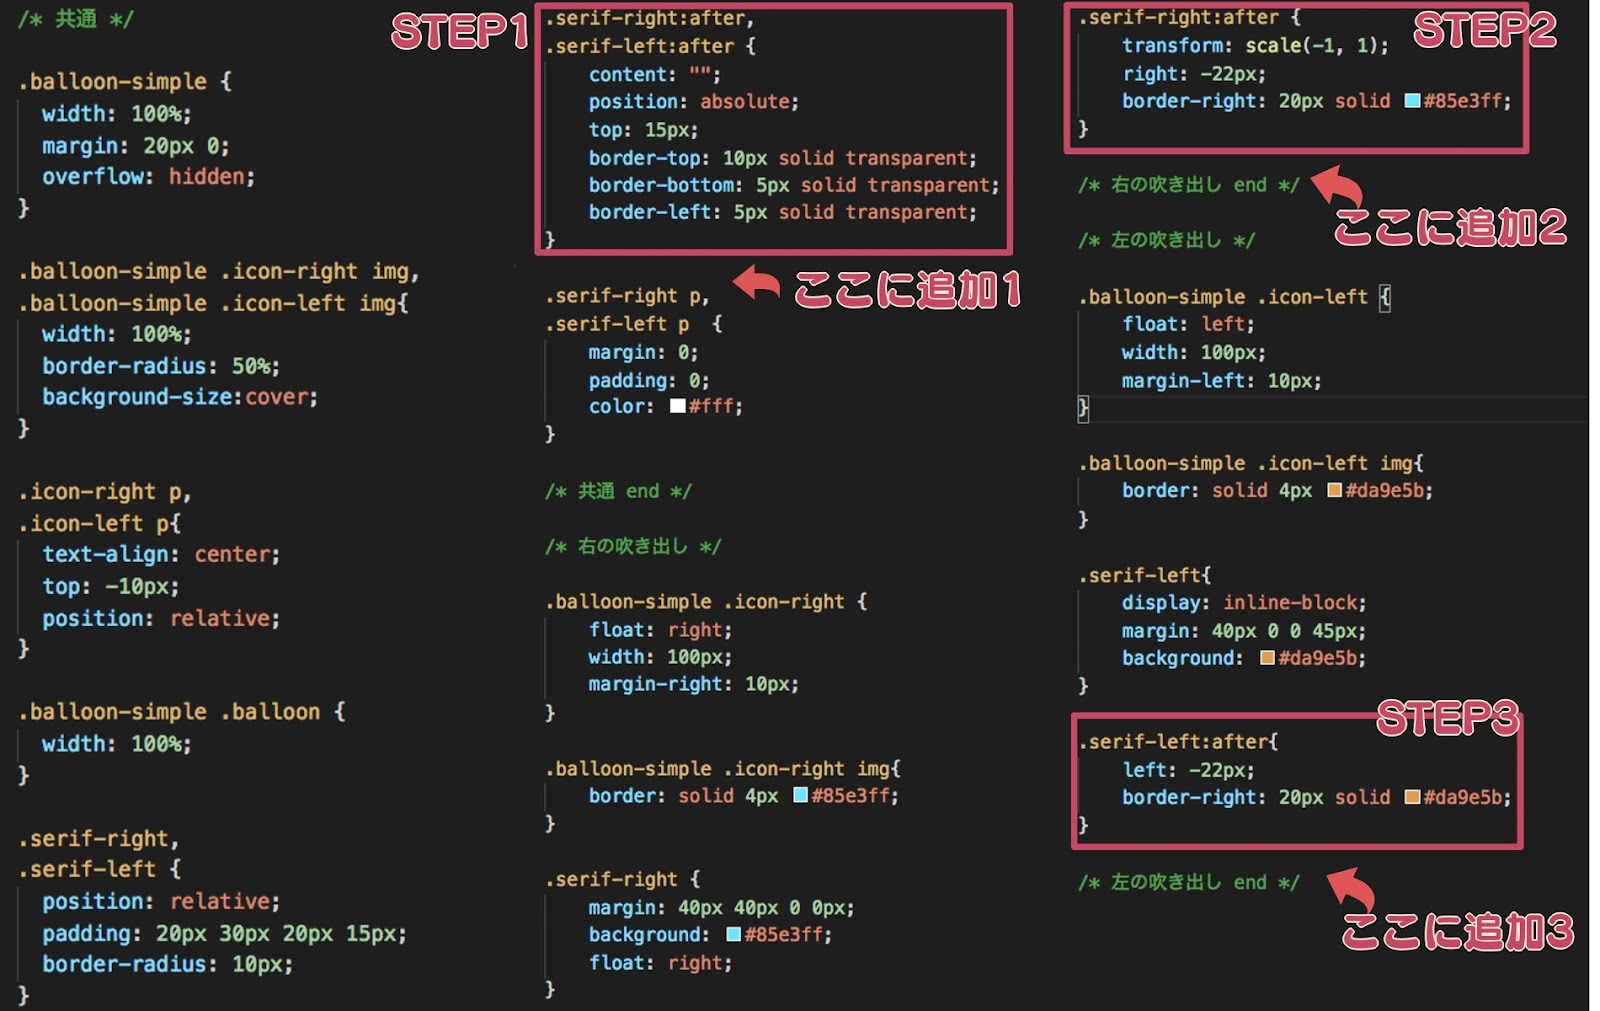
【css変更前】
STEP1
.serif-right:after,
.serif-left:after {
   content: "";
   position: absolute;
   top: 15px;
   border-top: 10px solid transparent;
   border-bottom: 5px solid transparent;
   border-left: 5px solid transparent;
}
STEP2
.serif-right:after {
   transform: scale(-1, 1);
   right: -22px;
   border-right: 20px solid #85e3ff;
}
STEP3
.serif-left:after{
   left: -22px;
   border-right: 20px solid #da9e5b;
}【css変更後】
STEP1
.serif-right:after,
.serif-left:after {
 content: "";
 position: absolute;
 top: 40px;
 border-radius: 50%;
 width: 15px;
 height: 15px;
}
吹き出しの三角部分を作成していた、border-top、border-bottom、border-leftプロパティを削除しました。
三角部分を丸い形に変更するために、border-radiusプロパティ、widthプロパティ、heightプロパティを追加しました。
STEP2
.serif-right:after {
 transform: scale(-1, 1);
 right: -22px;
 background-color: #85e3ff;
}
吹き出しの三角部分を作成していた、border-rightプロパティを削除しました。丸い形の背景色を指定するために、background-colorプロパティを追加しました。
STEP3
.serif-left:after{
 left: -22px;
 background-color: #da9e5b;
}
STEP2と同様の変更です。
ここに追加1
.serif-right:before,
.serif-left:before{
 content: "";
 position: absolute;
 top: 30px;
 border-radius: 50%;
 width: 10px;
 height: 10px;
}
考え事風の吹き出しになるように、吹き出し横の丸をもう1つ追加して2つ並べるために上記のcssを追加しました。
ここに追加2
.serif-right:before{
 right: -35px;
 background-color: #85e3ff;
}
2つ目の丸の背景色を指定するために、background-colorプロパティを追加しました。
ここに追加3
.serif-left:before{
 left: -35px;
 background-color: #da9e5b;
}
ここに追加2と同様の変更です。
3.アニメーションをつける方法
以下の2つのアニメーションを指定する方法をご紹介します。
- アイコンを時計回りに回転させる
- 吹き出しを浮き上がらせる
アイコンを時計回りに回転させる
アイコンを時計回りに回転させるアニメーションをつけたい場合は、以下の画像にあるSTEP1のcssを変更して、その下に新しくcssを追加します。
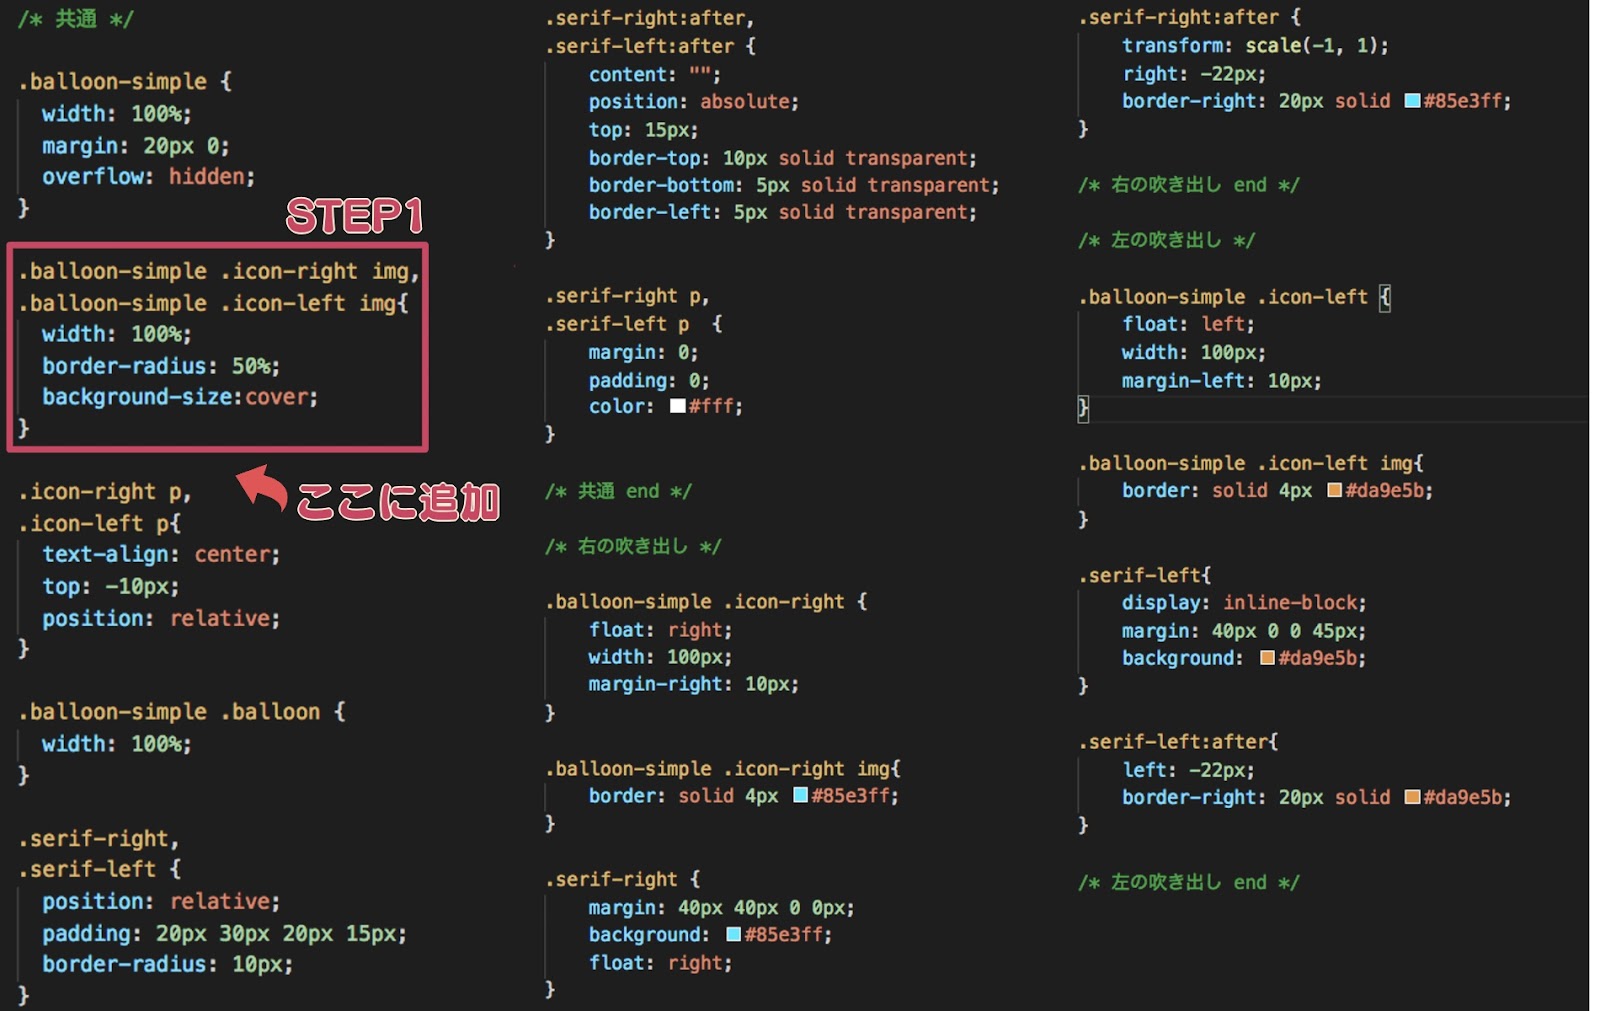
【css変更前】
.balloon-simple .icon-right img,
.balloon-simple .icon-left img{
width: 100%;
border-radius: 50%;
background-size:cover;
}【css変更後】
.balloon-simple .icon-right img,
.balloon-simple .icon-left img{
width: 100%;
border-radius: 50%;
background-size:cover;
transition: all 1s linear 0s;
}
transitionプロパティは、時間的変化を指定する際に使用します。
追加するcss
.balloon-simple .icon-right img:hover,
.balloon-simple .icon-left img:hover{
  transform: rotateZ(360deg);
}
:hoverは、疑似クラスといいユーザーがカーソルを要素の上に持ってきた際の状態を指定できます。また、transformプロパティは、要素の2D・3D変形を指定する際に使用します。
今回は、アイコンを時計回りにしたいため、アイコンがカーソルでホバーした際に、transformプロパティで動きをつけるように設定しました。
吹き出しを浮き上がらせる
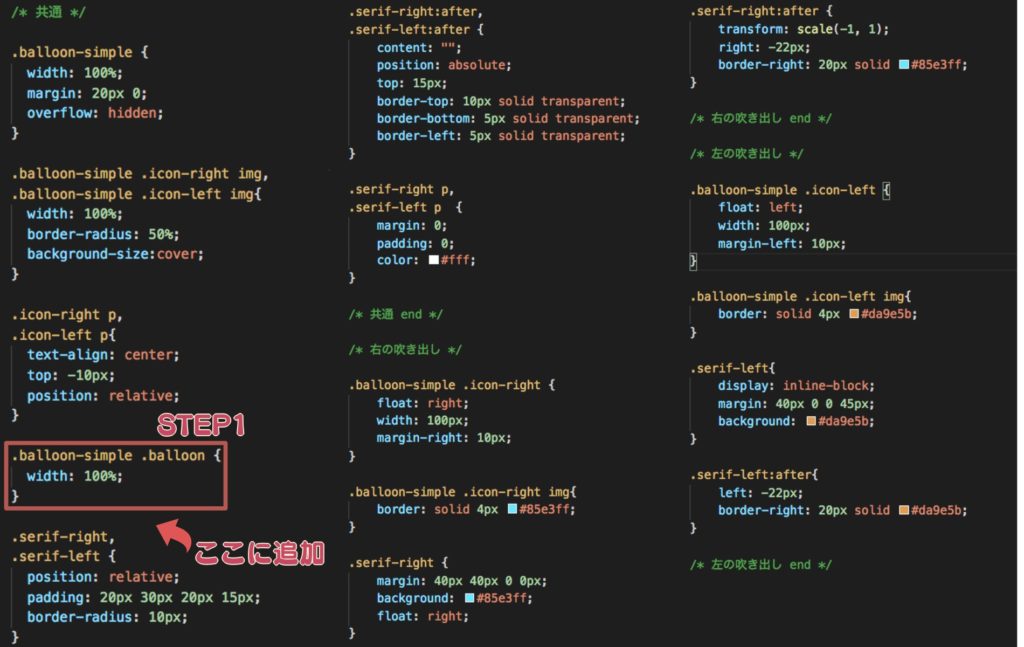
【css変更前】
.balloon-simple .balloon {
width: 100%;
}【css変更後】
.balloon-simple .balloon {
width: 100%;
transition: all 0.6s ease 0s;
}
追加するcss
.balloon-simple .balloon:hover{
  cursor: pointer;
  transform: scale(1.1, 1.1);
}
吹き出しに、ユーザーがカーソルを持ってきた際に、transformプロパティを設定して吹き出しの縮尺を変更するようにしました。
吹き出しをhtmlとcssで作ってみよう
WordPressでプラグインを使用せずに、htmlとcssを使って吹き出しを作成する方法をご紹介しました。
プラグインで作成できる吹き出しは、吹き出しの種類や機能がすでに決まっており、自分で好きにカスタマイズできません。
しかし、htmlとcssを使用して吹き出しを作成できるようになれば、吹き出しの形を変更したり、アニメーションをつけたりと、自分の気に入った形でカスタマイズできます。
ご紹介した、会話風の吹き出しのhtmlやcssを活用しながら、自分でオリジナルの吹き出しを作成してください。

